Sunday, May 24, 2009

Photo Cube...

Yes this photo cube is for my brother in law again...yes why him again......

I use the Tiger Beer's coaster 4x4" to turn into this photo cube and I like this idea very much since I saw it last year from one of the website.

Now, finally I can make one using my Zutter...I really enjoy doing this and it only takes me few hours to finish today.

If you wanna have one for yourself...let me know ya...once I have my free time I can make for you...

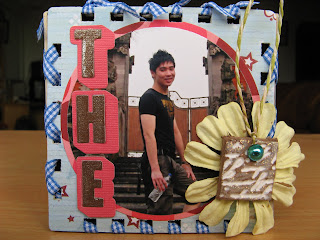


The wording here is "I like to travel the whole world"...specially for my brother in law because he likes to travel...A LOTS...


Flowers...yes...I like to use flowers...
First Project for Bind-it-all

This was done about a week ago and actually this was Becky's project and she wanted to bring this back home to Hong Kong for her mother's gift.

I help her to arrange the layout and matching some colors...and of course the last part was Bind it all...yah...it was so fun to play with it.


You see the heart shape?  That was from the soft clay that I did before and I used the Hero Arts's stamp on the clay and cut it out.  After the clay dried, I use Crimson Red from Versafine for the colouring and stickles from Rangers...

We put some ribbons in between the rings.  This is very easy to do and you can just finished the project within a day...
Bind It All


Oh dear...I'm so happy to get this Bind-it-all machine...it does help a lot with my project now and I really falling in love with it.  

First of all just to let you know the price that I paid for.  I went to check with Made with Love and they are selling at about $135 and I was so surprise when I saw Spotlight was selling at $80+...of course I got it from Spotlight.   I'm so happy with the price that I paid for and further more the o-wire price also cheaper at Spotlight.

I have started and completed a few project and I do believe that there are more to come.

Wednesday, May 20, 2009

Soft Clay...

I bought this soft clay from Daiso, is only $2 per packet and is very light.  I saw this from one of the website (can't remember which one), they used the clay to make embellishment.  Well after saw it from website I was looking for a small packet of clay to try it out until I saw it from Daiso.  This soft clay really very funny, it very light and unlike those heavy clay, and this soft clay also air dry.  The different of the soft clay is when it dried it feel like a foam...funny right?


So what I did here is, I rolled it out flat and use my new rubber stamp from Hero Arts stamped on it to form out the patterns.

You see the patterns right?

After I stamped the pattern on it, I cut it out into different shapes, I made it into buttons, pendants and let the air dry it.


After air dried, you can use any ink like Stazon, Versafine or Distress ink to color, you may even apply a layer of Glossy Accents on top of it.

Try it out, you may like it, you can do any shapes and any colors to match your project and is very economic...$$$...heh heh...

Sunday, May 10, 2009

Queen's Birthday...


This card is specially made for my husband's dear sister (cousin), she is now in KL and my brother in law is going to meet her coming Friday.

Yes she is her father's Queen and that is why I added a "tiara" on Cinnamon's head.

I hope she likes the card that I specially made for her and wish her a belated birthday.

Saturday, May 02, 2009

Willow with Flowers


After completed one WOJ's immediately I started with another design, this one is Willow with flowers.  This sketch is quite simple and this time I used the Craft Cutter from Carl to cut out the curve shape, I;m cutting 2 papers in one time and you can get the same shape for the mapping and the pattern paper.  One stone kill two birds...heh heh heh...

So anymore to come...yes my next card should be starting very soon...is either WOJ, Sarah Kay or...Magnolia...yes!!!
Enjoy a cup of hot Chocolate


Again, I'm 100% enjoy of doing this card.  This card I specially made for one of my friend's belated birthday.  I hope she will enjoy this hot chocolate from me... :-)
I delayed this card is because I'm waiting for my shipment from Simon Says Stamp.  

I used the Caran D'ache's color pencils with Sansador and distress the edge with Old Paper distress ink from Ranger.
For the 2 buttons, I use the clear buttons from Hero Arts and I pasted them on a piece of distressed newspaper, isn't it nice and matched with my card?

I just wanted to pass this message to my friend..."I remember your birthday"...

Wednesday, April 29, 2009

My First Whiff of Joy


I'm so happy that finally I owned this stamp. I cannot get WOJ over in Singapore so I had made the order thru Simon Says Stamp and I just got it on last Friday.
This is one of the very rare simple card that I have made so far but I really enjoy making throughout the whole evening. I also realised that I have improved in my coloring maybe because of this nice stamp...I feel more distress now.
Since I still have a few more WOJ's stamp, I'm going to enjoy myself for the coming long weekends...yes...

Tuesday, April 28, 2009

The Moment in Botanical Garden

I specially made this album for one of my good friend.  That day she suggested to me to have branch at Botanical Garden and this sound very interesting to me so I join her there.  We have a wonderful day and we end with a nice steamboat dinner

We took lots of photos and I wanted to make her this album so that she can keep it.

Here I bought these wood board album from Spotlight and this wood boards are from KaiserCraft.  First before I glued on the pattern paper I used the sand paper to sand all the corners and sharp ends.  After that I applied a layer of bright copper all purpose ink from Tsukineko round all the edges of the boards.

After all these completed I paste the pattern paper with Mod Podge from Plaid.


This is the cover.


To use the key to open the future.

Empty space for journal


The future is within your control, go for it.  This photo was taken by me... :-)

Flower Power...


Capture the moments.


These are the new dew drops that I just bought from Simon Say Stamps...


I hope you like it...

I'm going to start another project soon...

Sunday, April 19, 2009

My First Mini Album


This is my first mini album and of course I used my brother in law's photo again for experiments...heehee...

At first I tried not to use any flowers for embellishment but after all it looks so plain and I decided to add some so that it looked more "rich".  So I used most of my distress florwer from Hero Arts and some I made my own.  

This album killed my weekends and I spent most of my time just to complete it.  However, I'm happy with the final result and the most important things is he likes it...ya...other wise he will blame for cropping his photo..haha...

After I completed this album I decided to make another one for girls, no guys for this time because it was so difficult to match colors and embellishment.  What do you think?

Front Cover.  This is for his Jakarta trip.


The flowers are from Hero Arts and I stamped it on Basic Grey pattern paper.


Back Cover.


The black paper is for him to write journal...but I don't think he will write lo...cos he is a bit kind of lazy lo...lol