Showing posts with label Tutorial. Show all posts

Saturday, July 03, 2010

How I colour the little Tilda

This is a very simple way to use colour pencil with blender for colouring and it is also easy to bring around compared with watercolours.

What you need is colour pencils, blender which is Sansodor and paper stump. You can get all this Sansodor and paper stump from Art Friends.

Tilda's image, Sansodor and paper stump

Low odour solvent


Normally, I will pour some of the Sansodor into a little platter...you can get this little platter from Daiso, 6 in 1 packet and only cost you $2.00 so as the squeezer, also 6 in 1 from Daiso

Face, these are the colours I use for face

Started with the lightest one

Dip the paper stump with the blender

Blend with paper stump for the 1st layer

Apply 2nd layer with darker tone

blend again with paper stump

you will get the darker tone effect after the blending

The colour looks so smooth

3rd layer, use the most darker tone, touch up from the side of the face so that it won't turn up too pinkish...

Here it is...

For hair also use the same technique, start with lighter colour and go darker layer by layer...


Is very simple and easy to follow, go with you favourite colour tone and you can do with many Tilda and other stamping images.

Saturday, May 29, 2010

Grunge Paper Rose...

I would like to say sorry that I unable to snap the photo while I was doing the rose, firstly I was too excited, secondly my hands are so dirty to touch on my camera...and thirdly I think I need to hire a camera man...hahaha

Anyway I will share with you how Tom Holtz made his and please click HERE to get the steps and you can make your own roses...

I do not have many flowers stamp and specially those with 6 petals...when I wanted to give up I saw that I have a clear stamp from Hero Arts...and hey...after counting it has 6 petals... :)

I stamp 3 images on the grunge paper the cut it out. It is easy to cut, just follow the lines.

After that I spray with Tattered Angels...as you know I have many colours of them...so I just spray and spray and spray...mixing with many blue, red and brown tone of colours.

And the picture shown are the after I have completed the "cocktail mixing"...

Here is the close up wet look of the flower. Tim Holtz used the perfect pearls and distress re-inker...but I found out that using Tattered Angels will save lots of hassles...easy that applied the distress ink with a sponge...just spray and spray...heheheh...

For the rest of the steps, I just follow his instruction and here it is...the rose...

I follow Tim Holtz to apply a layer of Rock Candy as the touch up and the rose will stay on glossy and shinning...

I really like the grunge paper...It so durable than normal paper...start to make your own now...

Saturday, October 31, 2009

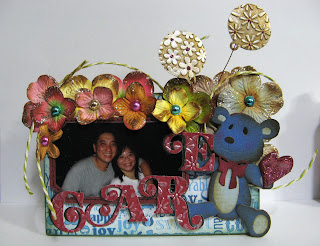
The Power of CARE Bear

This is my not my first handmade photo frame but is my first time I did this for myself.
I bought this QuicKutz limited edition Teddy Bear dies from JDA, instead of using the normal brown color, I turn it into blue...my favorite color and also it matched the Care Bear too. The different here is the heart was held in his hand instead of on his stomach...

The cost of doing this frame is quite cheap as I bought this wooden frame from Daiso, which is just $2.00.
This is the wooden frame, is empty and is flat and that is the reason I bought it.

First I applied the Mod Podge on top of the frame and after that I put the pattern paper on top.


This is the back of the wooden frame.
My hand was holding the stand, is a very simple frame.

you can see the glue on top of the wooden surface.

After I paste the pattern paper, I used Broken China Distress Ink to ink the edge and tone down the color.

Once the pattern paper settled own I started to layout my favorite picture and the bear. The alpha set that I used is Nutmeg and is also from QuicKutz.

I did the embossing for the balloon and the alphabet...this embossed effect was so great and it came out from my new Epic Six...the result is super...you must have it...

Simple and easy to make...

Wednesday, May 20, 2009

Soft Clay...

I bought this soft clay from Daiso, is only $2 per packet and is very light.  I saw this from one of the website (can't remember which one), they used the clay to make embellishment.  Well after saw it from website I was looking for a small packet of clay to try it out until I saw it from Daiso.  This soft clay really very funny, it very light and unlike those heavy clay, and this soft clay also air dry.  The different of the soft clay is when it dried it feel like a foam...funny right?


So what I did here is, I rolled it out flat and use my new rubber stamp from Hero Arts stamped on it to form out the patterns.

You see the patterns right?

After I stamped the pattern on it, I cut it out into different shapes, I made it into buttons, pendants and let the air dry it.


After air dried, you can use any ink like Stazon, Versafine or Distress ink to color, you may even apply a layer of Glossy Accents on top of it.

Try it out, you may like it, you can do any shapes and any colors to match your project and is very economic...$$$...heh heh...

Friday, April 10, 2009

Make Your Own Felt

After you use the die-cut tool cut out the shape, you peel the right side paper so that you can apply the fun flocks on top.

Here is how it looked like after peeling the paper.

Apply the fun flocks on the sticky side and press the flocks on the chipboard.

And here is the final result...easy to do right?

Sunday, February 22, 2009

How To...

I would like to show you how to overlap the image for rubber stamping.

First of all stamp the image that you like on a piece of paper.

After that stamp another one use it as dummy.  Since I'm going to do the ground, I will cut the bottom of the dummy copy.

Lay the dummy copy on top of the original.

The here come the Rock Path rubber stamp from Hero Arts.

You got the image stamp on the dummy copy now.

Now remove the dummy copy and here you got the whole picture with a nice back rock path.