Friday, November 28, 2008

Gift Tag...Tag You're It Challenge...

Yes...X'mas gift tag.  We have a gift exchange in my company and after balloting I got Hui Gek's name.  I just bought her a gift and started to make her a gift tag immediately once I reached home today.

I used a round blank coaster and paste it with pattern paper, after that I used Penny Black's Snow Smile with versamark and embossed it with Distress Powder to create a weather-worn look...you feel rough when you touch the surface and that is the effect.  Is very suitable to used on this type of brush-stroke image.  For the background I used distress ink to rub it and spray the water on it to make the uneven water mark.  As you know recently I'm so hook on to this type of distress technique... :-) 

Thursday, November 27, 2008

Owl/Bird ATC...

Owl or Bird...recently I'm so hook on distress technique and I applied this technique onto this ATC.  I use the background stamp with 3 colors Brilliant Peacock ink for the 1st layer and after that I continue to distress the edge of the card.

I choose the collage stamp from Hero Arts - Live Well and I stamped it with Versafine Vintage Sepia.  For final touch-up, I used color pencil to color the bird and leaves.

Is  a simple ATC and I hope that my group of buddies will enjoy it...

Wednesday, November 26, 2008

Explosion Box...

This is the second explosion box that I did for a friend's birthday.  Actually this was requested by her team member to do something special and nice for her.  I really put in  my 100% effort into this box...

After I completed this box I told my husband I that it looked so beautiful and I feel a bit of uncertain whether should I keep it or give it...However I understand that the person who is going to received this box will treasure it and I'm happy to give it to her... **wink wink**...

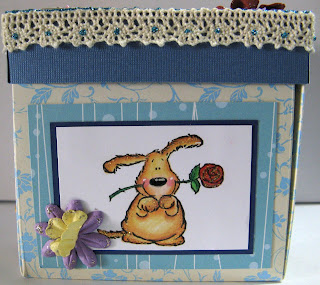
This is the cover of the box and all the stamps that I used are all from Penny Black except the dinosaur from Stampendous.


This is how it looks like when the box opened.

and this is the cute dinosaur from Stampendous.   

Tuesday, November 25, 2008

My New Note Book...

This is my new creation and I used the Swirls Clear Stamp from MSE.  I used more than 1 stamp to form a 4x4 page.  

To save the material and be more environmental friendly, I used the old calendar from last year to do as the base for the note book cover.  I did the embossing and distress on normal 160g paper and paste the embossed sheet on the used calendar.  

After punching holes I completed with ring and it became my new note pad.  Is was so simple and easy to do.

I used a big round dauber from Tsukineko to apply all purpose ink on the embossed paper to make it looks more shinny and glittering

Here is finished...and this all purpose ink is one of my favorite...


Monday, November 24, 2008

Photo Wedding Card

Yesterday My sister came to my house to made this card for her friend's wedding in Taiwan.  This card's idea was from 2 of us and we used pink as the base color.  I used the same embossing technique but this time I used different embossing powder from Tsukineko and effect was so nice and matching with the wedding theme.

This is the first time I did my own pattern paper and I'm going to use this in most of my future project.  I can use what ever color that I like as well as the Rubber Stamp...why not right?

Inside the card I used this Turtle Love's clear stamp from MSE and they look so cute right?  I just like the wordings... " May the journey be slow and sweet..."


Friday, November 21, 2008

Distress Post-it Notes Holder

I like to use this distress technique again and let me show you how I did it.

Materials that you need to prepare are Rubber Stamp, VersaMark, paper, embossing powder, heat gun and distress inks.

This time I used 2 DesignBlocks from Hero Arts as the background stamp.  I tried with 2 different types of embossing powder, one is clear embossing powder from Hero Arts and another one is Kaleidoscope Transparent embossing powder from Stampendous.

Stamp the DesignBlocks with VersaMark on the piece of white sheet of paper.

Embossed it with clear embossing powder or any transparent embossing powder.

This is normal clear embossing...

And this is the effect from Kaleidoscope embossing powder.

Apply the distress ink directly on the embossed paper and you can use the sponge to spread the colors too.  


After the ink covered the whole piece of paper, I will sprayer to spray clear water onto the surface.

Use the cloth to dry the water and after that you may use the hear gun to dry the paper.  be careful when you use the heat gun, don't over heat otherwise it will overheat the embossed background.


Here are the two different DesignBlocks and embossing powder used.

Before place the post-it notes, I used the binding system from CarlaCraft to bind them together.  You may find out more about this binding system here.  I like this tools because it is not bulky and is very handy and easy to use. and I bought it from JDA (Junior De Artist).


Here is the final products...

You can try it out now...

Thursday, November 20, 2008

Distress...

I like this distress technique.  It is very simple and easy to do...
1. I used VersaMark to stamp and after that finished with clear emboss.
2. Take the distress ink and directly apply on the paper.
3. Spay water on the paper and dry it with a cloth.

I will post the tutorial step by step soon... :-)


Snow...
Papertake Weekly Challenge - Snow
Cute Card Thursday Challenge - Snow + Snowflakes

Combine Challenge Papertake and Cute Card...

I like snow flakes and last year I used the snowflakes for the office decoration...and now I did for the card.  First of all I need to thank my brother in law Erland, he volunteer to do the coloring for the snowman and I completed with the snowflakes and some chalking and embossing.   He likes this card a lot...I wanted to give to him but he refuesed as he said he would like to one on his own.  So now I'm looking forward to his creative work...hopefully not after Christmas ya... :-)

This stamp is from Stampendous and they look so cute right.  I have a few ideas for this stamp and this is one of my ideas...


Tuesday, November 18, 2008

One for One Dollar...

Well...one for one dollar...good deal right?
Of course I won't miss the chance to grab all of them which are 6 dies, 6 clear stamp and 8 pairs of tags from QuicKutz...I got it all from JDA.  I bought 20 in total so I just pay for $20.00...Good Deal ne...

I'm starting my Christmas project now and this all are coming in the right time...and yes I'm enjoying it and happy to have them all in time.  Yes...


Only limited available, if you want it please grab it fast...while stock last :-)


Green...

Friday Sketchers - Sketch #28

This is a great sketch and this time round I used green color as the base color.  

I like to use background stamp on the pattern papers so that the pattern will not look so "empty".  I used my favorite stamp from Penny Black again for this birthday card, I just like it and it work well with birthday greeting.  Since the background and pattern paper are green in color so I used the blue flower embellishment from Prima and blue button from Hero Arts. 

I used slightly less Stickles this time but I used Tiara Pens from Sakura to color the cake and effect about the same as using Stickles but more colorful.  Sakura Pens is one of the must have item for my card making tools and I bought this from Jo where she brought it back from Hong Kong.  


Monday, November 17, 2008

Birthday Wish

Sketch Saturday Challenge #25
Penny Black Challenge - Week 23 Monochromatic

First time enter Penny Black Challenge...
Penny Black is one my favorite collections and I used it in most of my cards.


I choose pink because pink was the color that requested by my friend for this card.  It was so easy to match the pink color pattern paper maybe because I'm so used to it already.  I used Hero Arts Wavy leaf and Happy Birthday pattern stamp as background.  Ink wise is the Worn Lipstick from Distress Ink and papers are from DCVW.
Blue...


Yes finally I had made a card with blue color.  I did this for my friend Jo and blue is her favorite color, same as mine.  All paper used are from DCWV and flowers are from Prima.  


I used the Liquid Pearl from Ranger on the those little dots and stitches around the borders.  I like this card a lot because it gives me a "fresh" look after making so many pink color cards.  The most important things is...Jo likes it and well...she did...


Saturday, November 08, 2008

Season's Greeting

Cute Card Challenge #35 Fairies + Angels
Fridays Sketchers Challenge #27


This is my first time to enter the sketch challenge...
I enjoy myself a lot when I took the challenge and I'm looking forward to do more of this type of challenge in future as well.


Well, this is my first season's greeting card and there are more to come as well.  I bought 4 angels from Stampendous and they are Guardian Angel, Shepherd Angel, Harmony Angel and Wreath Angel.  In this card I used Guardian Angel and this is one of my favourite angel.  


I matched this angel with DCWV's pattern's paper with QuicKutz Sophisticate's stamps.  I used Stickles and Liquid Pearl on those borders and the flower embellishment.  To make the angel looks more graceful I added Glossy Accent on the wings and the stars.

material used: angel and word rubber stamps are from Stampendous, swirls stamps from QuicKutz (Sophisticate special edition), Stickles from Ranger, pattern papers from DCVW and flowers from Prima.


Tuesday, November 04, 2008

Loving Couple

P is for Pink Challenge...


Yes, this is the third wedding card...
Finally I had completed the task.  This time round I choose to use Stampendous's stamp and I like this two monkeys that hug together.  
For background I used Tim Holts's Worn Lipstick to distress it and stamped with Hero Arts DesignBlock.  The ink pad that I used for the DesignBlock was Versafine's Crimson Red and it turned up with a good contra.


I used Fun Flock from Stampendous to layer the heart shape to create a 3-D effect.  It was really fun to used the Fun Flock, you can try with with lot of designs.  There is a trick to use this Fun Flock, first you need to color the base to the color that you like then only apply the same color of Fun Flock so that you won't see any white empty space.

So try it now and you sure have more ideas on how to used this Fun Flock.


Of course I'm not forgetting my Liquid Pearls and Stickles...


The photo unable to show you clearly that I have used the Glossy Accents on the monkeys.  Both of them are so cute and I decided to add the glossy on them.  Overall you can enjoy the card not only through viewing you may even touch to feel it.

Well, what's next?  I'm looking forward to do some Christmas project and hopefully is still not too late to start...